Good coating performance, in which desired service life is achieved, involves a vital convergence of parameters, and all of those factors demand equal consideration. When we say a coating system has failed, it means it can unpleasantly disturb the performance of the substrate it was envisioned to protect, thereby resulting in corrosion-based damage, blistering, and probably the origination of fatigue cracking. Such failures can damage the reputation of the manufacturer, and they can also lead to legal actions, recalls, and delays in delivery due to quality concerns.
Having a thorough understanding of why a coating failed is a prerequisite to preventing similar failures from reoccurring. Selection of the right product for the environment, applied over the proper surface prep under the right environmental conditions, is critical to gaining that result.
The selection of a coating is a multipart process that requires the designer to determine not only the purpose of the coating when it is put into service, but also how the item being coated is expected to be erected and positioned in service. The following steps should be considered when conducting any coating failure analysis:
• Determine the type of failure;
• Examine the complete coating application proceedings;
• Review the specification for the applied coating;
• Visit the site and collect photo evidence;
• Perform laboratory examinations of tests and samples, if possible;
• Report the failure mechanism.
Coating failures cannot be appropriately identified if any of these six steps is avoided because of a misleading supposition or assumption.
This article focuses on several coating failures on the external surfaces of a carbon steel cargo container. Because this container was newly constructed, a fresh painting system was applied and touched up or spot repaired in some locations. The period between painting and delivery of the container was eight months, and the paint failure showed up at various locations throughout the exterior surface of this container.
Proposal and Execution
The cargo site’s management personnel looked for an approach that, according to them, would stop further damage. The solution proposed and agreed upon was to repair the damaged coating.
The coating repair was completed and, to the disappointment of everyone involved, the surfaces near the damaged coatings were not overlapped. This was the second time the exterior sides had been coated. After several meetings, it was agreed that the site’s property manager would have the work inspected by an independent coatings inspector. This is where I came in.
Both the supplier and paint applicators stated that there was sufficient dry film thickness (DFT) and that the wall coating system had been applied properly. Contrary to what the supplier and paint applicators stated, I found that the coating failure was a direct result of an improperly applied coating system.
Case Study
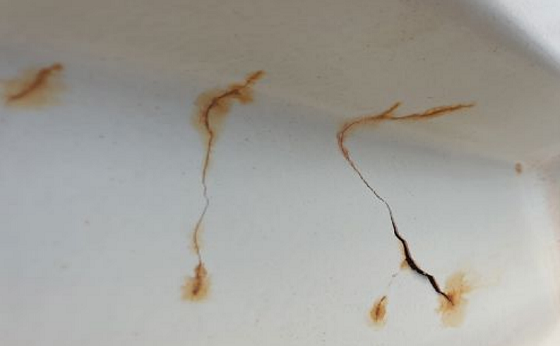
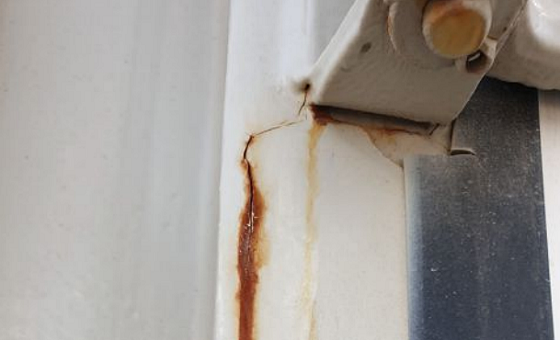
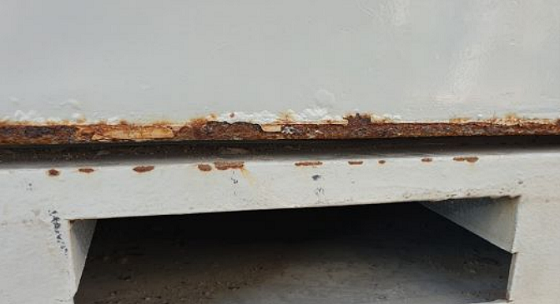
The 100 percent visual inspection showed the presence of multiple coating defects, including paint checking and cracking. The visual assessment revealed excessive cracks having reddish-brown rust stains bleeding out of those cracks. Blisters were clearly visible near the ground support as well.
The assessment indicated that most of the failure was from where the coating met the substrate, as the majority of the primer could also be seen. The surface underneath the coating system revealed rust deposits, which means that the coating lacked adhesion. It looked as though many large areas had been applied with excessive coating layers. Meanwhile, the coating was so thin (two-layered) in other areas that you could see through it. Rust stains/runs were evident in certain locations.
In some areas, the damaged coating was easily removed with fingernails. There were numerous points where the coating had totally delaminated. Some of the delaminations were 1 ft (0.3 m) long.

A coating thickness measurement was carried out at various locations of the container. An ultrasonic thickness gage was used to measure the DFTs of the final coating. The readings near the damaged coating locations were 6 to 8 mils (152.4 to 203.2 microns). This was well below the minimum required DFT of the project specs and the manufacturer’s product data sheet, which called for ~11 mils (279.4 microns). The readings near the edges and welding joints were 15 to 17 mils (381.0 to 431.8 microns).
Adhesion tests were conducted in five locations on the container. Since the intent was to cause minimum damage to the coating that was still intact, three dolly pull tests were used (at least three are required by ASTM D4541) in regions near the existing surface coating defects. Two out of three dollies showed poor adhesion via the pull-off test.
Salt contamination swabs were collected from the site and tested by argentometry to check the levels of salt content below the damaged coating.
A section of coating removed from the cracked coating location was randomly taken and analyzed using scanning electron microscopy/energy dispersive x-ray spectroscopy (SEM/EDS) to understand the different layers of the coating and to check the constituents at the base of the coating.
I came up with the following points as a result of my detailed investigation:
• A documentation review of the inspection reports as submitted by the container’s vendor did not indicate evidence of any sort of inspections of salt contamination during the surface preparation before proceeding with the coating application.
• Close visual examination showed evidence of multiple coating surface cracks, checking, paint runs/sags, and crazing imperfections.
• Adhesion testing revealed two out of three readings that did not meet the specification for adhesion compliance.
• Coating thickness measurements showed several locations that were either undercoated or excessively overcoated.
• The coating was found to be very rigid and showed evidence of almost no flexibility, which went against compliance with the technical data sheet (TDS) of the paint supplier/manufacturer. Evidence of failure during a coating flexibility test, even with minor bending, supported this conclusion.
• A random check on one section of the coating by SEM analysis showed evidence of gaps between different layers of the system. In addition, the coating did not comply with the project specification because there were not three layers of coatings.
• Tests conducted underneath the coating at three locations showed evidence of high levels of salt contamination. This implies that care was not taken prior to the coating application. Salt contamination on the surface of base metal can lead to a coating having poor adhesion.
• Rust stains were noted below the coating at a few locations, which implies that the surface preparation requirements for the coating were not fully followed during the coating application.

Recommendations
All of the above points indicated that the cause of failure of the coating was primarily due to improper surface preparation and coating application, which resulted in poor adhesion and inhomogeneous coating with gaps between the layers. The use of an improper mixing ratio of the resin and hardener also cannot be ruled out. Rusted surfaces and rust stains indicate that either the surface was not prepared properly or the prepared surface was left open to salts, grease, and other contaminants.
Unfortunately, we don’t know the atmospheric conditions in which the coatings were applied. However, we do know that the curing agent was forced to the top of the first coating layer and affected the adhesion with the second topcoat. We also suspect that it was possibly exposed to ultraviolet light due to the substantial rusting found.
Adhesion failure takes place because of surface contamination or condensation, incompatibility between coating systems, and exceeding the recoating window. It can be prevented by ensuring that the surface is clean, dry, and free from any contamination, and by ensuring that the surface has been suitably prepared. The correct coating specification needs to be used and the recommended recoating times should be followed.
Cracking of a coating system is generally a stress-related failure and can be attributed to surface movement, aging, absorption and desorption of moisture, and lack of flexibility of the coating. The thicker the film, the greater the possibility that it may crack. This can be prevented by using the correct coating system, application techniques, and dry film thickness. Alternatively, cracking can be prevented by using a more flexible coating system.
Based on all of the modes of failure seen in this coating failure, I first recommended removal and reapplication of the coating system. Abrasive blast cleaning (using a nonmetallic abrasive, such as garnet or grit manufactured from chilled iron) in accordance with NACE No. 2/Society for Protective Coatings (SSPC) Surface Preparation (SP) 10, “Near-White Metal Blast Cleaning,” would be the preferred method of surface preparation in this situation. Any oil or grease present on the surface has to be removed by wiping it with a solvent.
Second, I recommended that the paint materials be stored in a well-ventilated location, free from excessive heat or direct sunlight, and maintained at a temperature as recommended by the manufacturer. Storing, thinning, mixing, and handling of paint materials should be done in accordance with the TDS. All bottles should remain closed in workshop-sealed containers until needed for use. Each container must have full identification information, including the manufacturer’s name, product identification, batch number, date of manufacture, and shelf life.
Third, paint should be applied to dry, clean, prepared surfaces under favorable conditions and in accordance with the application data. All coatings should be homogeneously applied without runs, sags, solvent blisters, dry spray, or other blemishes. All blemishes and other irregularities ought to be repaired immediately. Special consideration should be given to cracks, corners, boundaries, weld lines, bolt heads, nuts, and small brackets to apply the stated minimum DFT by brush application if a spray application will not entirely shield all surfaces.

Application personnel ought to have sufficient experience in coatings work. Each coat should have dried sufficiently before recoating. Succeeding coats need to be applied within the manufacturer’s recommended time and temperature limits. Before application of the finish coat, the applicator should sand and smooth the prime coat or undercoat on all surfaces, which is required to attain a smooth coat of paint. Paint should not be applied to the objects to be coated when the weather conditions on the manufacturer’s instructions or this procedure do not permit.
I further recommended four inspection checkpoints while executing this job:
1. After the surface preparation;
2. After the primer application;
3. After the first coat application;
4. After applying the second/final coat.
Key Takeaways
To help avoid these types of problems, a pre-job meeting should always take place with all parties involved in executing the coating to discuss the end user’s/owner’s concerns and objectives and any issues the contractor may have.
The coating manufacturer should be present to clarify surface preparation–related concerns and application procedures. A post-job meeting should also take place with all parties to ensure that the work was completed per the project specifications. A third-party inspection would be even better to have on all projects, but it is not always practical or cost-effective for most small projects.
To avoid a premature coating failure, it would be sensible not only to choose the right system but also to apply it in a professional way according to the specifications. Correct application methods should be communicated and used. Even when applying a supplementary coating to a system already in place, it is critical to prepare the surface to guarantee proper adhesion.
The proper coating system selection, development of specifications, and coating system application, along with a good surface profile, are essential in achieving the expected system performance with a desired coating service life.